
actiPLANS offers a visual planning tool that allows you to schedule employee shifts, locations, events, and all other custom items.
The interface where you can do so is called Locations by default. However, you can rename it in line with your needs and preferences if you please.
The appearance of the Locations interface differs for managers and regular users:
- As a manager with the “Manage Schedules” permission, you see all employees’ location data within a single timeline.
- As a regular user without such permission, you have the interface divided into two parts:
- My Locations – A visual timeline where you can plan out your locations and see when you’re supposed to work.
- Locations of My Colleagues – A similar timeline with all the info on other employees’ work locations. This part of the interface is available only when the Access to Schedules of other users is enabled in actiPLANS settings.
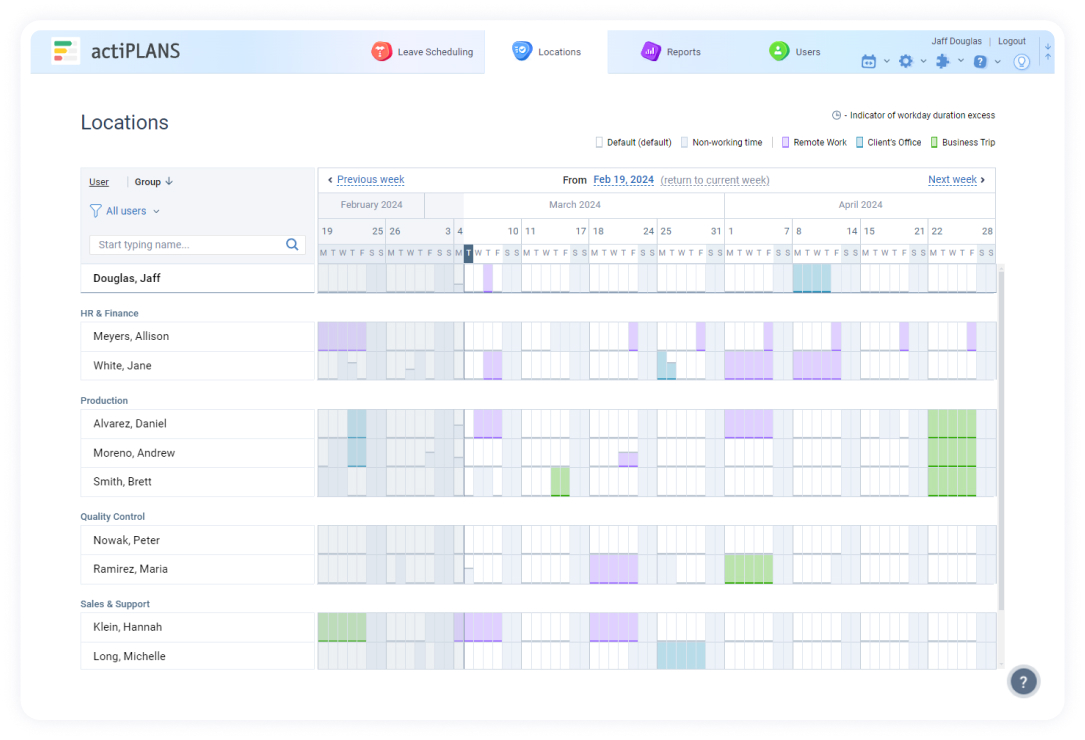
All the primary elements of the Locations interface remain the same for managers and regular users alike:
- Dates in gray signify non-working time: weekends, holidays, and scheduled employee absences.
- Dates in white point at the default location.
- Colored dates mark your custom location types.
- Gray dots appear on any date where the number of scheduled work hours exceeds the duration of the standard workday.
- When hovering over a date on the timeline, you can see a tooltip with essential information on leave and location types scheduled for the day.
- Above the timeline, there’s a sequence of all the location types that were created in your actiPLANS account. To change their order in the Locations interface, go to Settings → Locations and rearrange the list there.
Schedule parameters
The Type of Schedule functionality helps to categorize the various ways your team operates every day. It lets you sort out disparate work activities and indicate where, when, or how your employees are supposed to do their jobs.
However, to start using this functionality, make sure it is switched on in General Settings. There, you can also specify which work entities you’re going to schedule and how you’d like to call them overall: Location, Event, Status, Activity, etc.
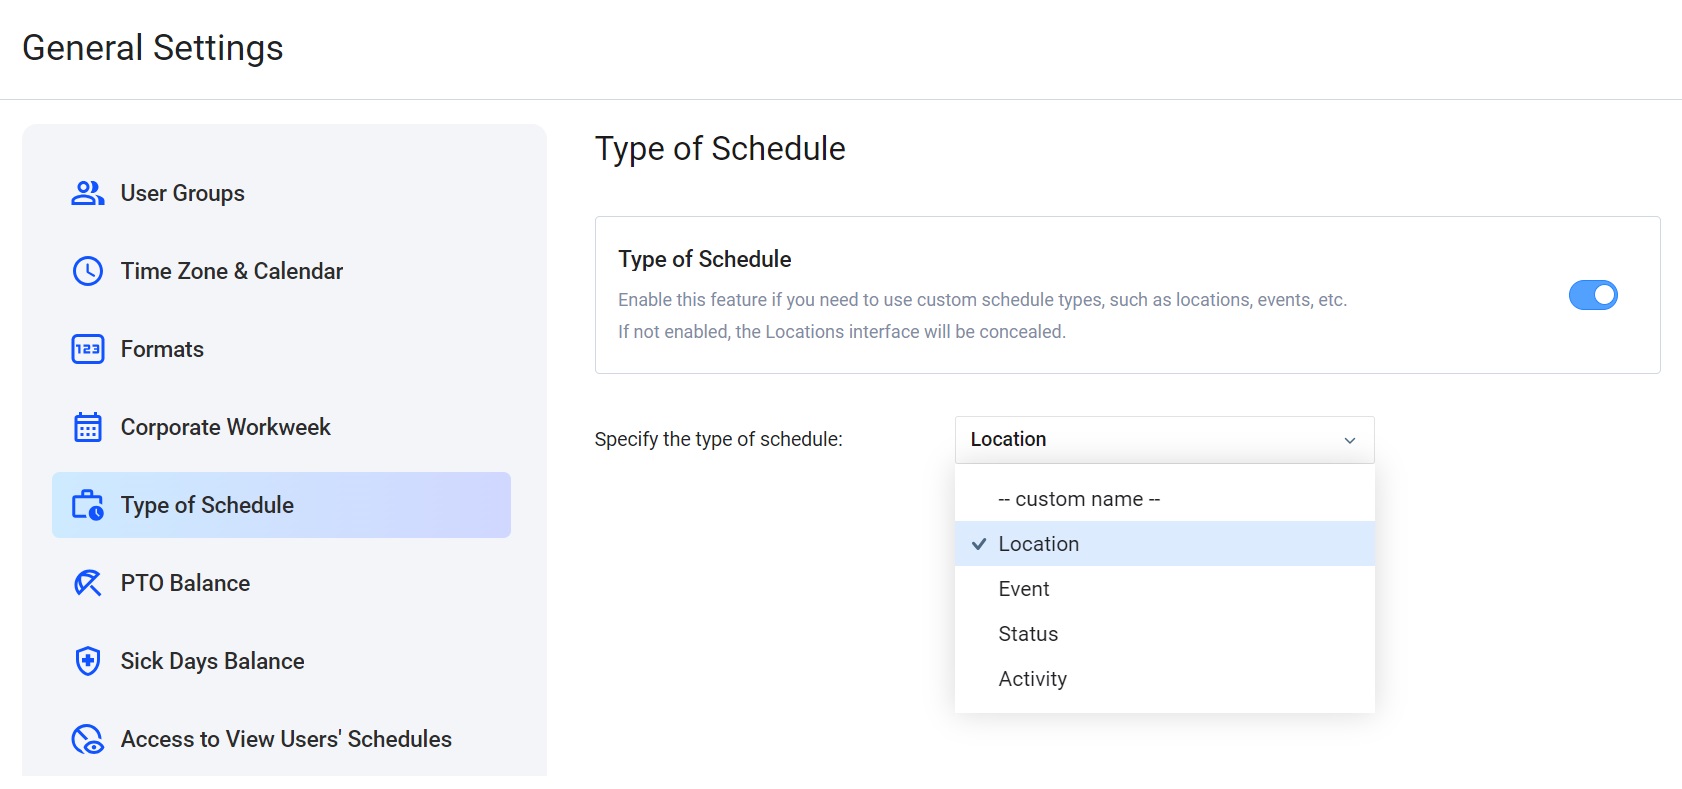
The type of schedule set in actiPLANS by default is Location. And before you can start assigning different locations to employees on the timeline, you need to add custom location types to your account:
- Open the Locations settings
- Click + New location
- Type its name
- Pick a color code
- Push the Save button once done

All the created location types are available for review via the Locations settings. There, you may edit, archive, or delete them whenever a need arises.
Note: It’s possible to delete merely those location types that were never used. If a location was scheduled on the timeline at least once, you can only archive it.
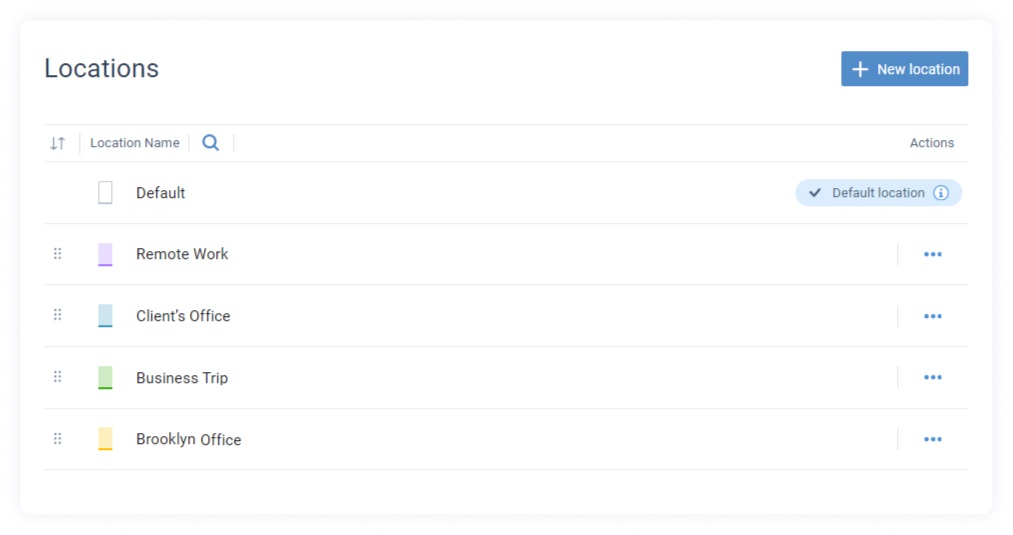
actiPLANS has a default work type. It’s always displayed at the top of the Locations list, it’s marked in white, and it cannot be deleted. However, you can always give this default location a custom name and use it as part of your unique work scheduling system.
Note: To create, modify, or delete locations in actiPLANS, one needs to have the “Manage Users and Settings” permission. The Locations settings are not available to regular users.
Scheduling process
How to Schedule Locations
Users with the “Manage Schedules” permission can create location schedules for themselves and the assigned employees, while regular users can only change their own locations.
To schedule a location, one needs to:
- Select the necessary period on the timeline
- Click + Add location
- Choose the necessary location type from the drop-down menu
- Clarify how many hours a day it should be scheduled for
- Specify if you’d like to skip non-working days on the timeline or schedule the location right over them
- Repeat steps 2-4 to add multiple location types if necessary
- Push the Save button after you’re done
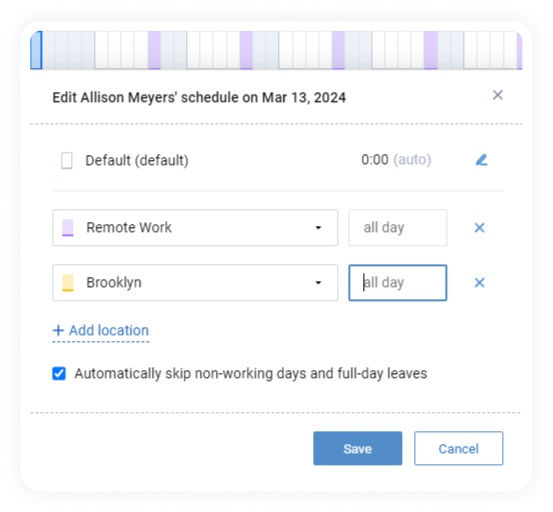
How to Edit Location Schedules
To edit the created location schedule, follow these steps:
- Click on the required date
- Replace the set location by picking a different item from the drop-down menu
- Alter the number of scheduled hours if necessary
- Schedule an extra location for the day if you wish
- Push the Save button after implementing the changes
- Click the Clear to default button if you want to delete the scheduled locations entirely
Note: Whenever a location schedule is created/edited, actiPLANS can automatically notify users about the changes via email. For more information on how to apply these notifications, visit this page.
