General settings
- User Groups
- Time Zone & Calendar Settings
- Type of Schedule
- Corporate Workweek Settings
- PTO & Sick Days Settings
- Access to Colleagues’ Schedules
- Modification of Past Schedules
- Access to Leave Time Requests of Unassigned Users
- Access to Leave Requests During PTO Blackout Days
- Processing Non-Approved Leave Requests on the First Leave Day
- Number Formats
- Lockout Policy
- Two-factor authentication
To modify absence management settings, click on the cog icon located at the top of the interface and choose the settings group you want to modify:

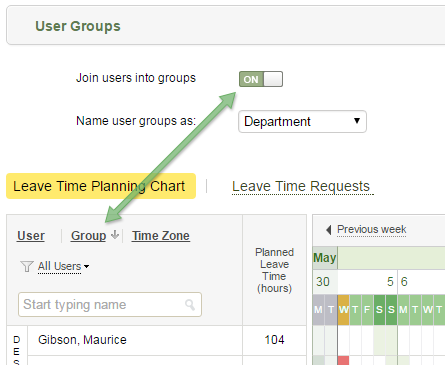
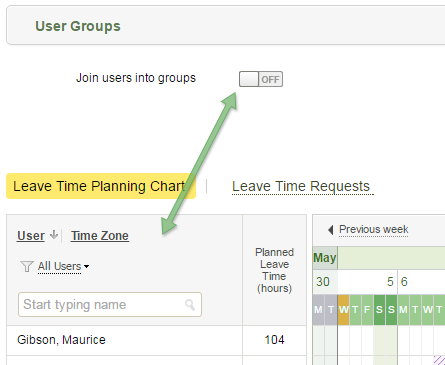
User Groups
When the user groups feature is turned on, you can filter and group users by departments in the system interfaces:
When the user groups feature is turned off, the filter by departments is hidden, and users are sorted by their names:
By default, user groups are named ‘Departments‘. You can change this default name and use one of the pre-configured names, or enter a custom name:

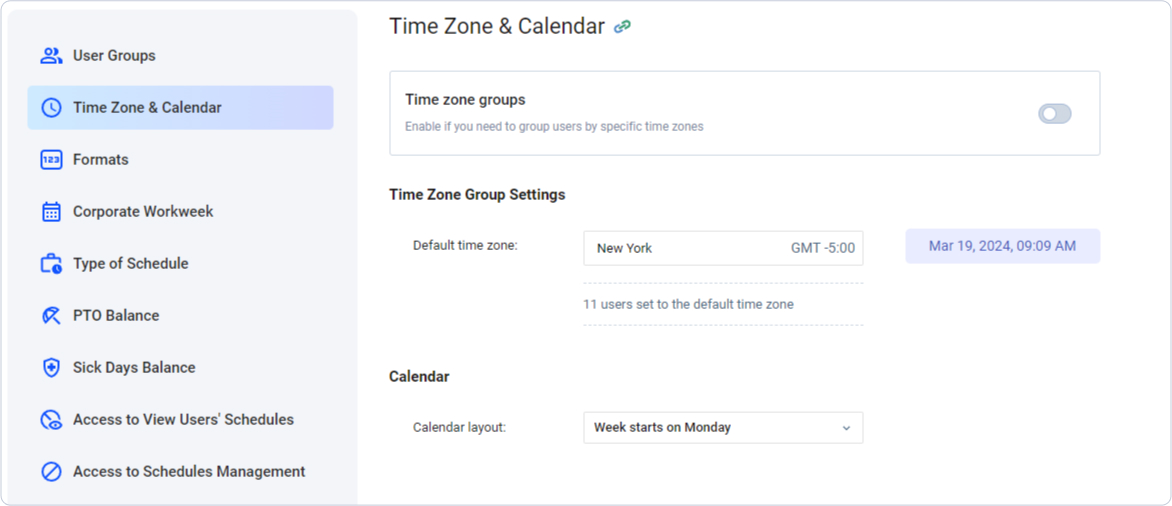
Time Zone & Calendar Settings
Time Zone & Calendar settings allow you to configure the starting day of the week and default time zone group. The start day of the week is used for visualization of week boundaries in charts displaying personal and corporate schedules. The default time zone group is applied to new users added to the absence management system.
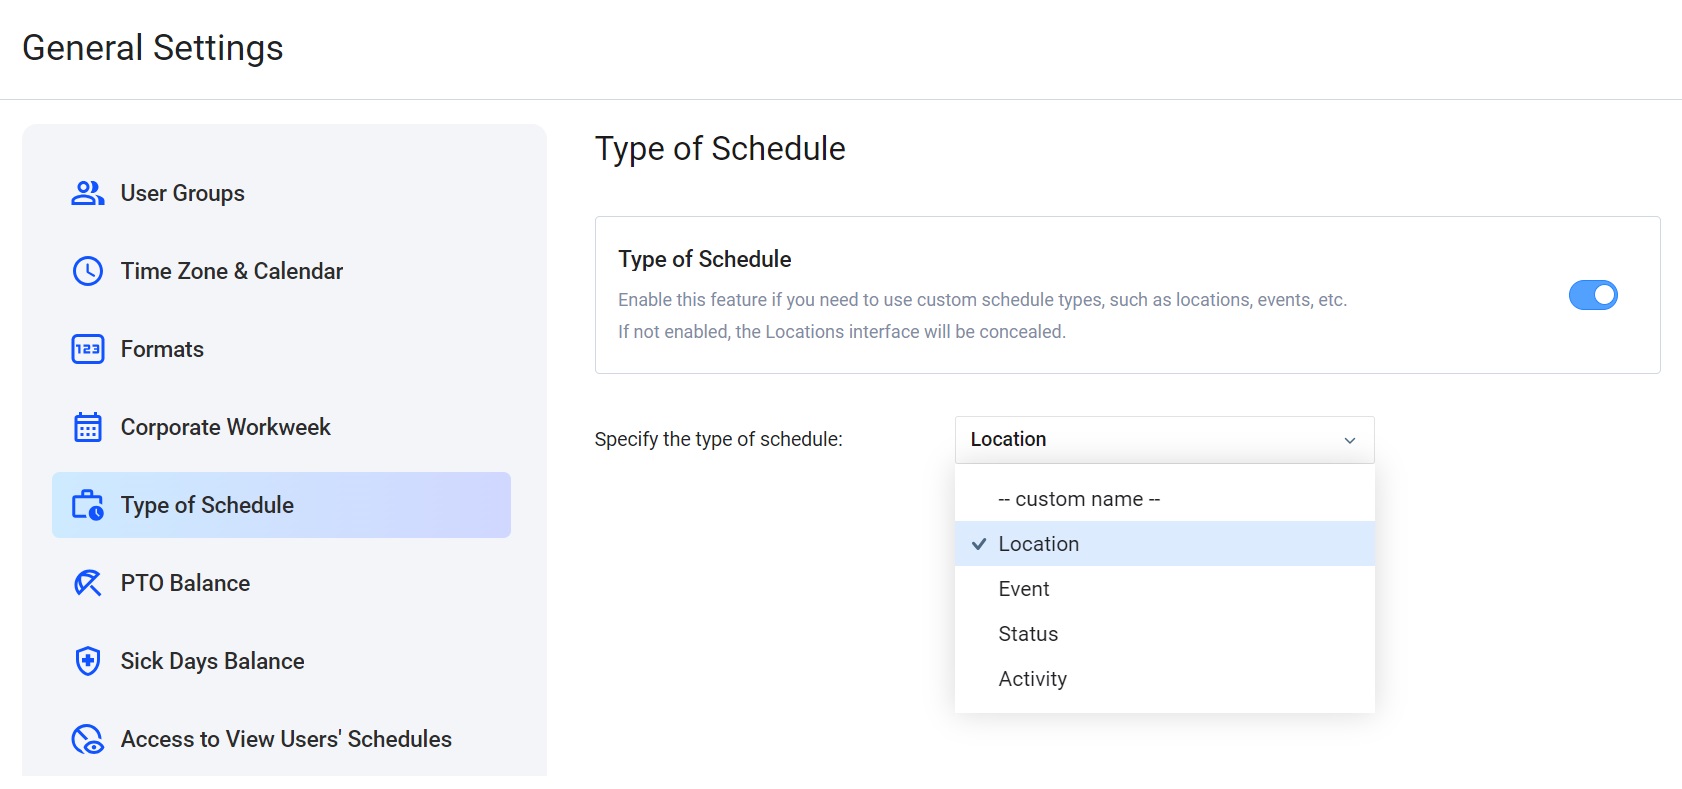
Type of Schedule
Here, you may switch on / off the Type of Schedule functionality and pick a general name for your custom schedule items.
Location is set as the default type of schedule in actiPLANS, and in case you decide to turn off this functionality, the Locations interface and settings will no longer be available to users.
Corporate Workweek Settings
Corporate Workweek Settings are meant to configure the default workweek for all actiPLANS users.
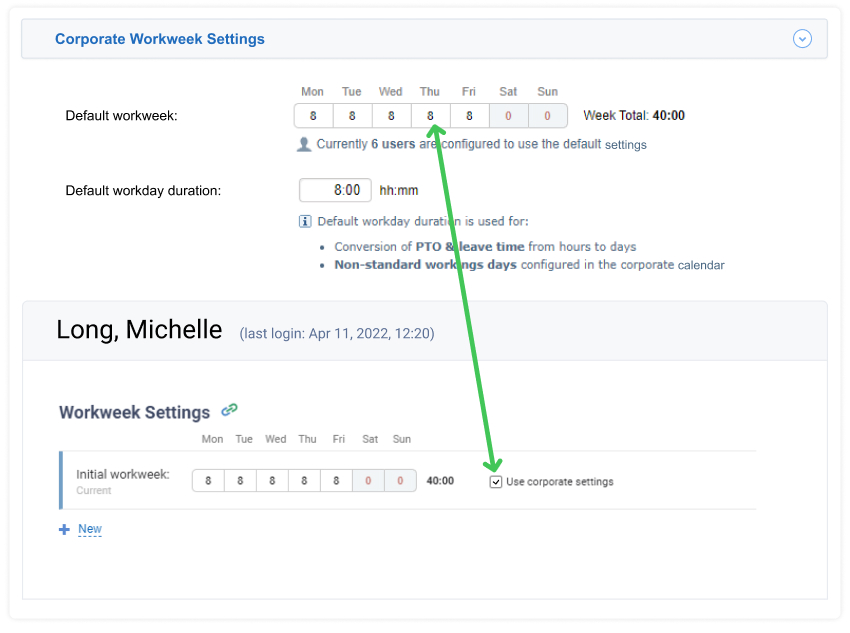
Default workday duration is configured in the system settings along with the default workweek settings and is used for:
- Conversion of PTO & Sick Days time from hours to days
- Non-standard working days configured in the corporate calendar
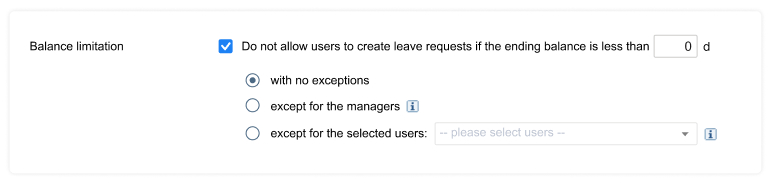
PTO & Sick Days Settings
PTO & Sick Days settings configured here allow you to specify the default PTO and Sick Days accrual rules for system users in the absence management system, and define how to display the values of PTO and Sick Days balances in the system interfaces.
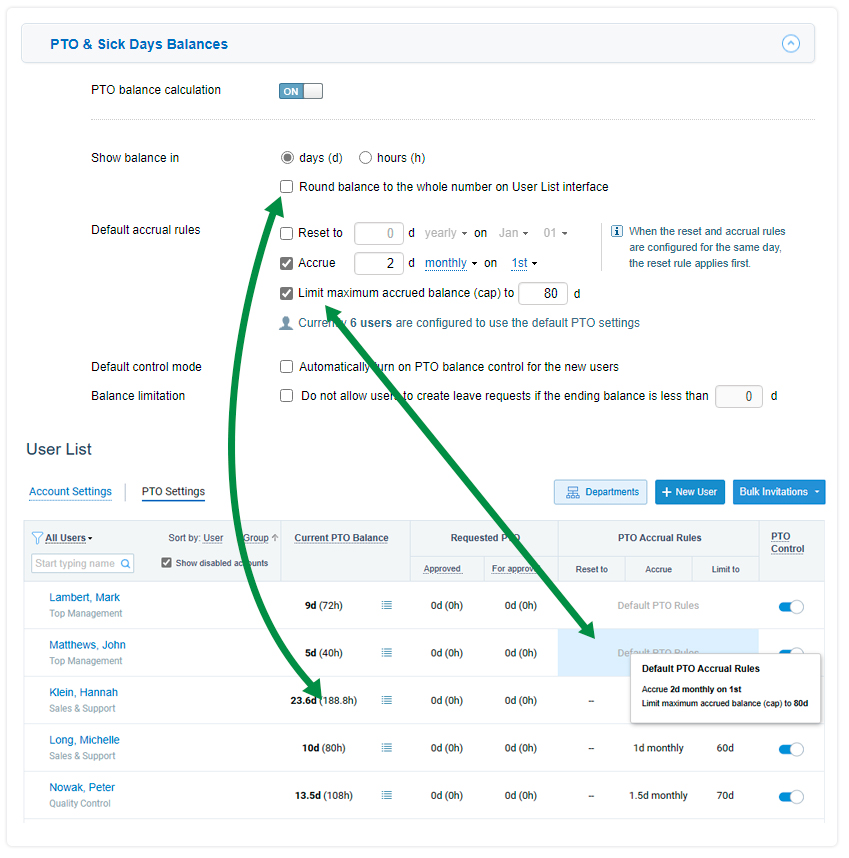
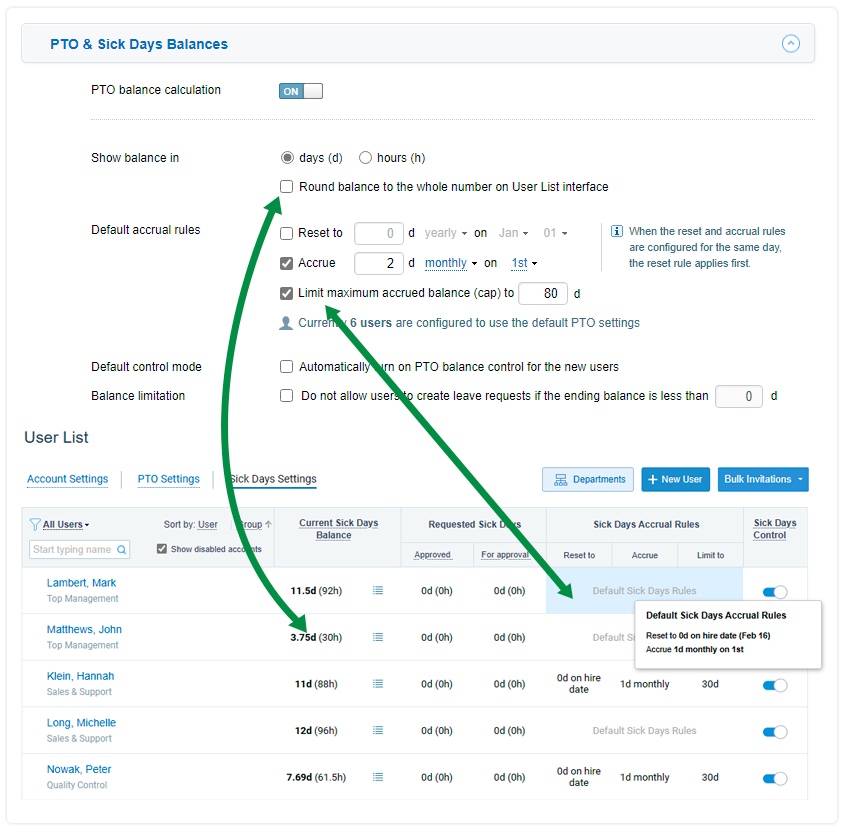
The Balance limitation settings allow you to prevent users from submitting leave requests when their PTO or Sick Days balances reach a certain threshold. These leave request rules can be applied either to all users, selected users, or everyone except managers.
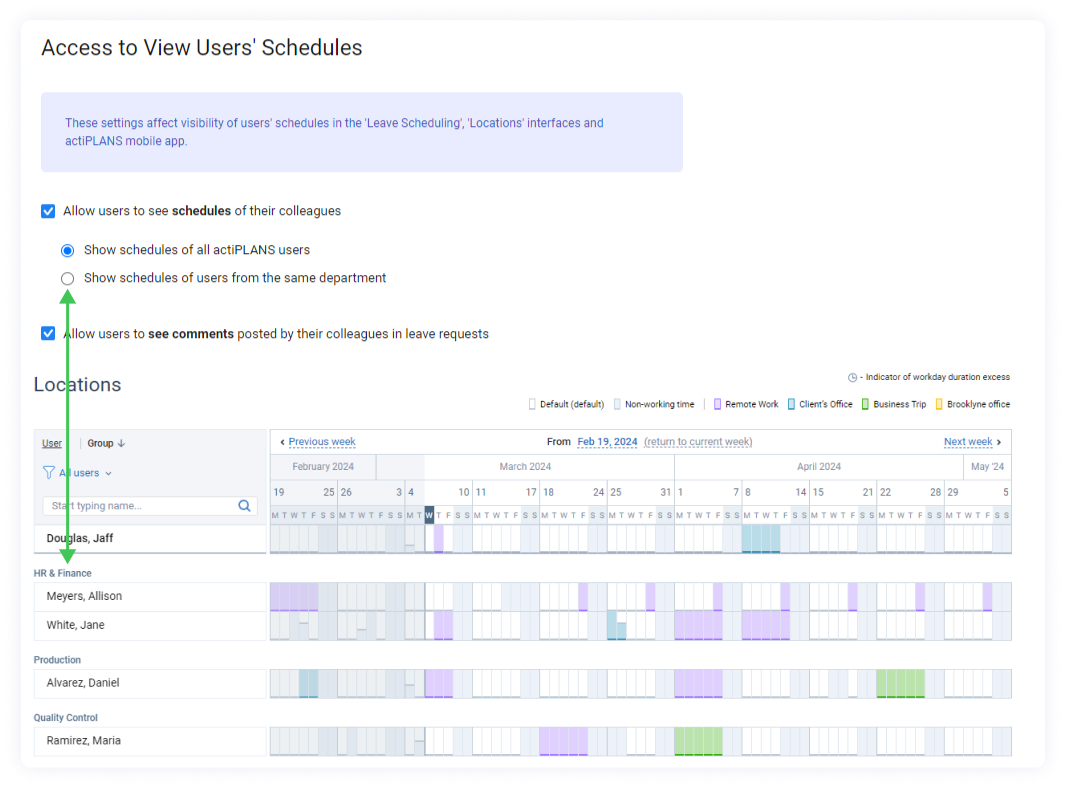
Access to Colleagues’ Schedules
These settings define whether regular users can see the schedules of their colleagues in the Leave Scheduling and Locations interfaces.
Modification of Past Schedules
If your actiPLANS account is not integrated with actiTIME, past leave requests, and location schedules can be modified directly in actiPLANS. To enable this feature, select the ‘Allow users to edit and delete their past schedules’ option in the ‘Access to Schedule Management’ section.
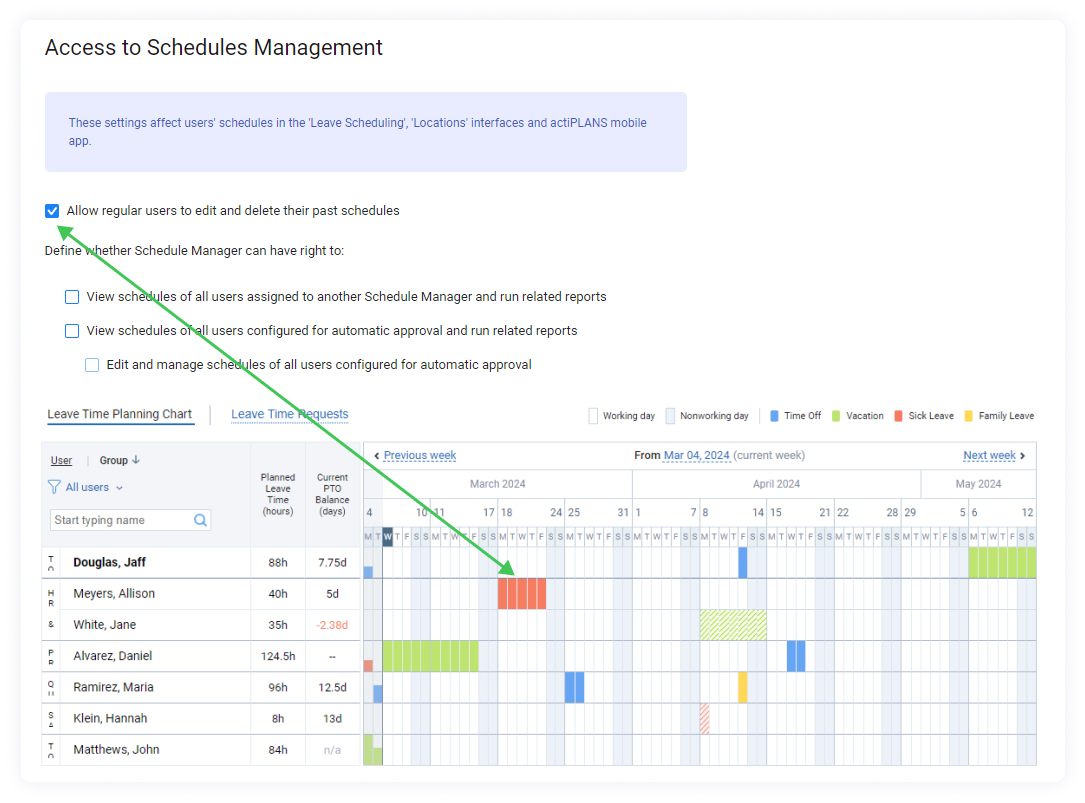
If the feature is switched off, only managers can edit their assigned users’ schedules (but not their own schedules). When the feature is switched on, every user can manage their personal past schedules.
In integrated actiPLANS + actiTIME accounts, past leaves can be deleted or modified in actiTIME only.
Access to Leave Time Requests of Unassigned Users
These settings define whether the leave time manager can see and manage leave requests of unassigned users in the Leaves Management interfaces:
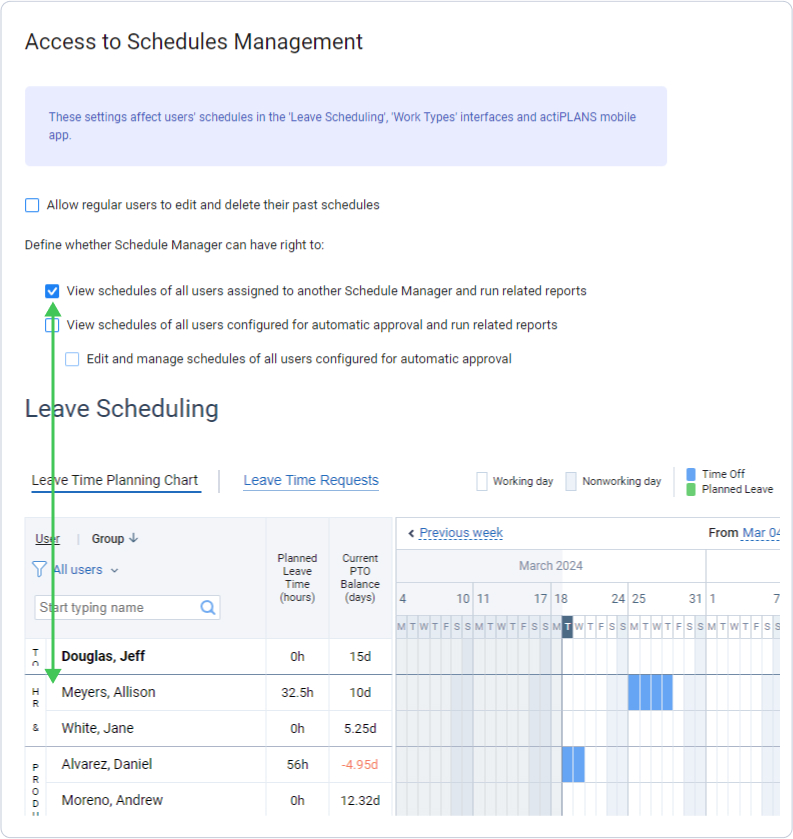
By default, the leave time manager can see and process leave requests submitted by assigned users only. However, you can configure absence management settings, so that the leave time manager will also see requests from other users – those who are configured for automatic approval and those who are approved by other managers.
Access to Leave Requests During PTO Blackout Days
These settings give some users the right to request time even for the blocked leave types during PTO blackout days. You can grant it either to managers or users whose leave requests are approved automatically.

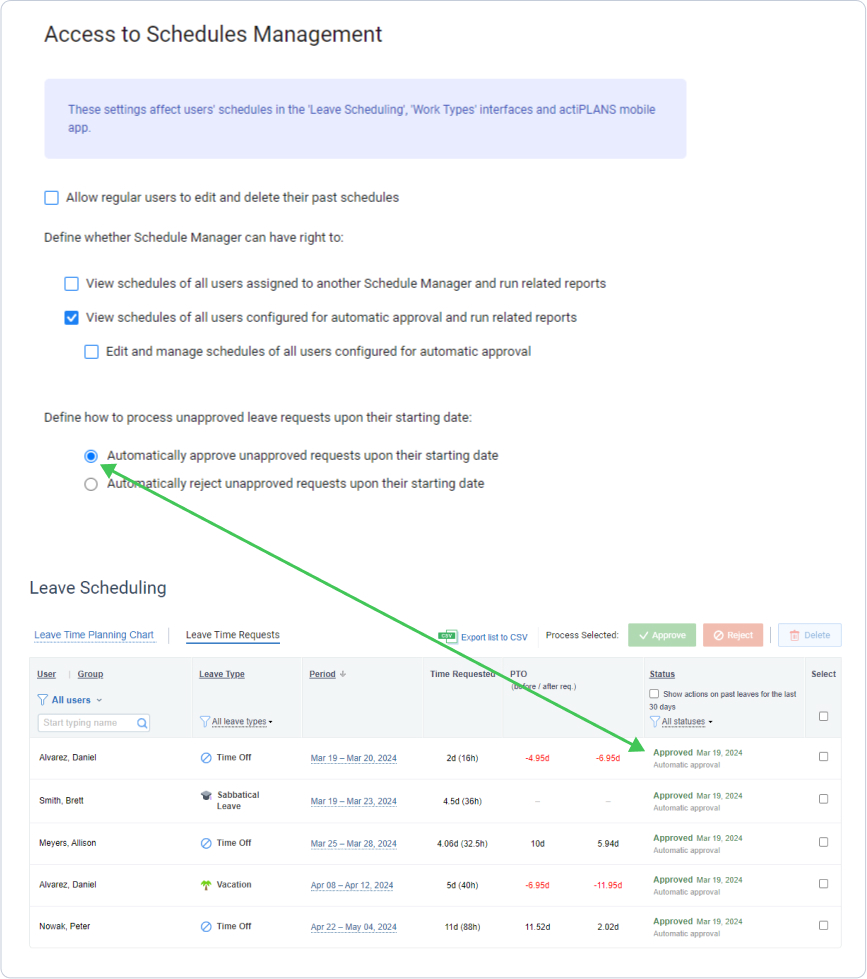
Processing Non-Approved Leave Requests on the First Leave Day
This option allows configuring how non-approved leave requests should be processed on the first day of the requested leave: automatically approved or automatically rejected. Select the necessary option in the ‘Access to Leave Time Requests’ section.
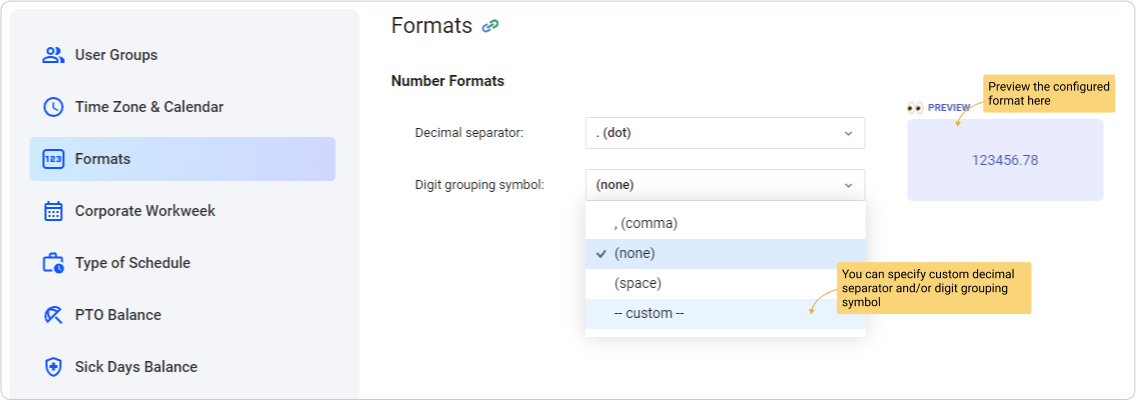
Number Formats
Here you can configure actiPLANS to display numbers in the format matching your regional standards:
Lockout Policy
A lockout policy is a standard tool used by administrators to block users from entering their accounts after a certain number of unsuccessful sign-ins. Such a measure serves to reduce the threat of malicious attacks and minimize the risk of account abuse.
Under the default security settings in actiPLANS, users are automatically locked out of their accounts for 30 minutes after failing to log in 6 times in a row. However, admin users can set up preferred lockout policy rules in the Lockout Policy section of the general settings.
To do so, check the Use lockout policy box and then specify desirable values for:
- Lockout duration – a period for which an account gets temporarily disabled after a series of login failures. The timeframe can vary from 0 to 1440 minutes, whereas the value of 0 means that disabled user accounts can be unlocked only manually by admins (in other cases, it happens automatically).
- Lockout threshold – the number of possible sign-in attempts before an account gets blocked. The threshold value can be anything from 0 to 999, whilst 0 indicates that the number of unsuccessful logins is unlimited, and users never get locked out.
- Reset lockout counter after – a period during which a user can retry to log in after the first failure until the sign-in attempt counter is reset to 0. This period can last from 0 to 1440 minutes. If the selected threshold value is more than 0, the reset value must be either LESS THAN or EQUAL TO the lockout duration value.
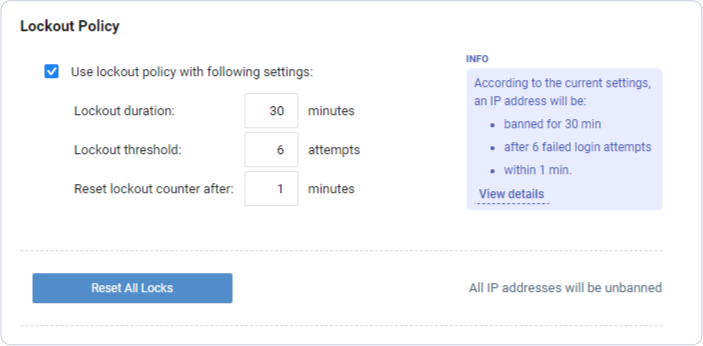
Whenever you need to unlock some of the blocked IPs manually, you may use the Reset All Locks button. After the reset request is successfully processed, you will receive an on-screen notification in real time, and all the previously locked-out users will be able to sign in to their accounts right away.
Leave types
To open the interface for editing leave types, click on the cog icon located at the top of the interface and choose the Leave Types option:
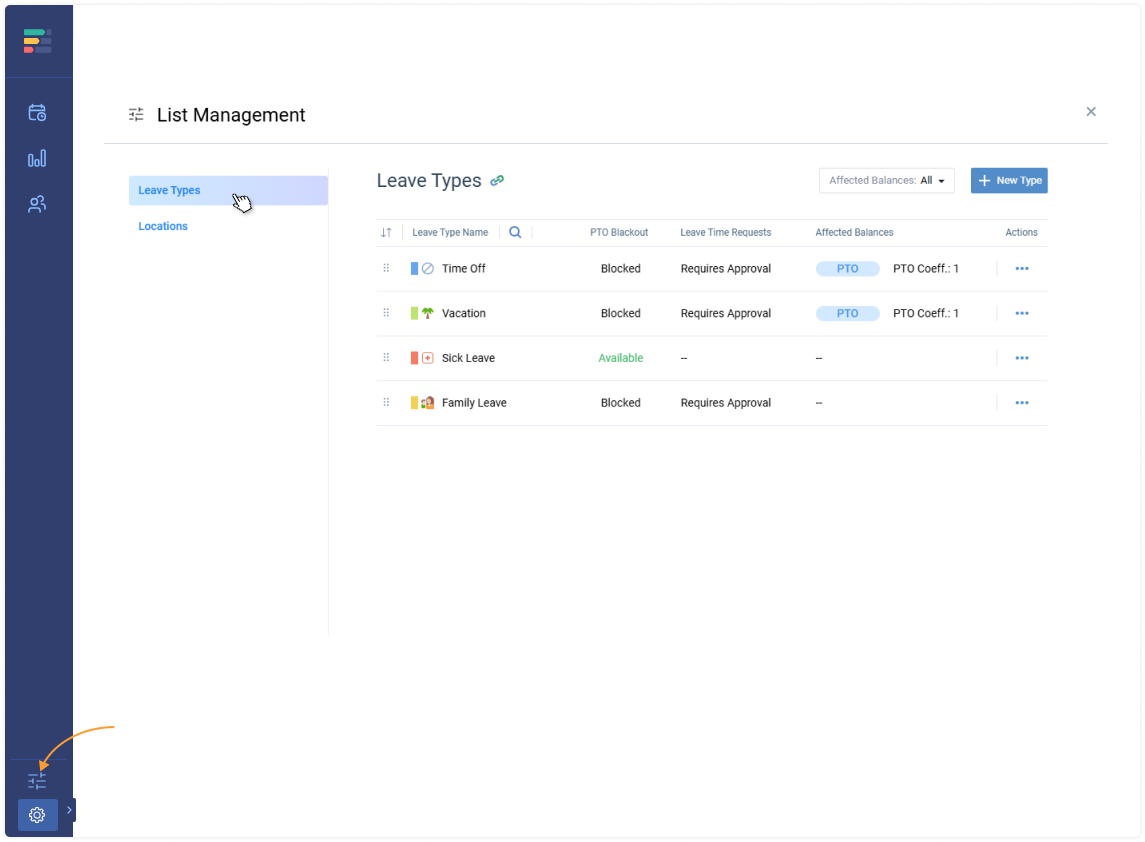
You will see the interface listing all leave types registered in the system:

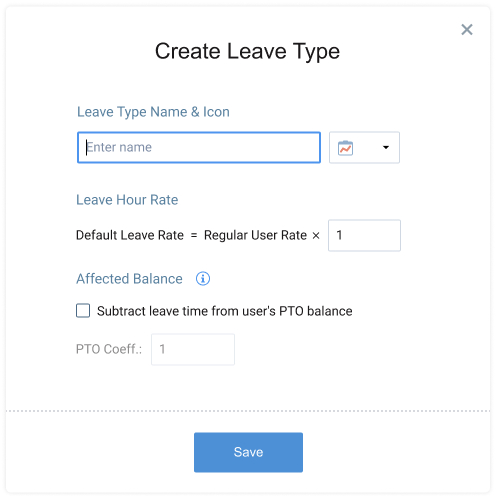
To create a leave type, press the + New Type button. Then, in the opened pop-up window:
- Give it a unique name
- Pick an icon for it
- Specify which affected balance it should belong to (PTO Balance, Sick Days Balance, or none)
- Set an hourly rate for the leave type
- Indicate whether it requires approval and if it must be blocked during PTO blackout days
- Save changes once done
To edit a leave type, just click on its name in the list. And in case you need to archive or delete it, press the Actions button in a corresponding line and choose the necessary option:
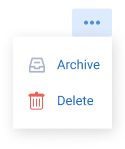
Please note that it’s impossible to delete those leave types that were scheduled in the system at least once – such leave types can only be archived, and you can view or reactivate them via Archived Leave Types.
To change the position of leave types on the list, you may simply drag and drop them in the necessary location. Besides, it’s possible to sort your leave types in several preferable ways (by name, affected balance, or coefficient) and pick which leave type categories to see or exclude from the view for any given moment.
Locations
To create or edit locations in actiPLANS, click on the cog icon located at the top of the interface and choose the Locations settings:
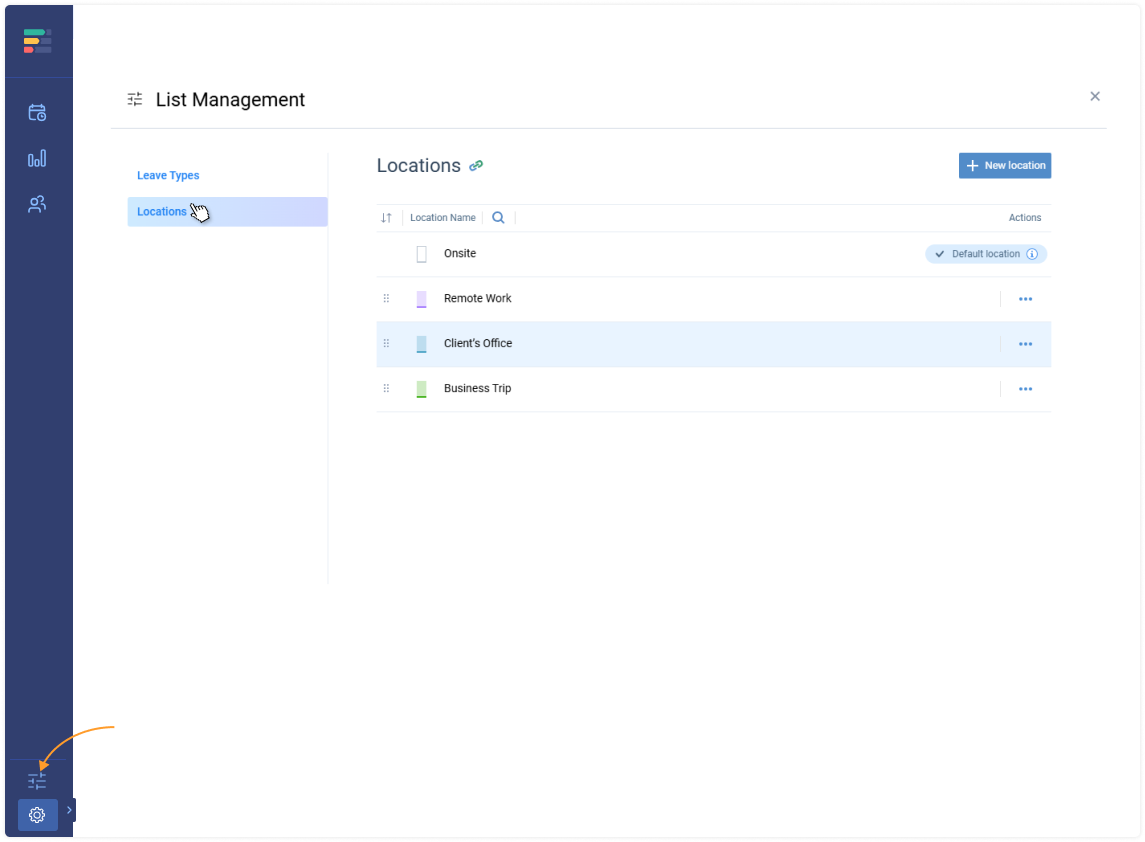
In the opened interface, you will see the list of all the location types ever created in your account.
Note that at the top of the Locations list, there’s a default location type, which automatically applies to your entire team. This location cannot be moved below, deleted, or assigned with a different color other than white. Nevertheless, you can give it a bespoke name and apply it as part of your organization-wide work scheduling system.
To add a custom location type, click + New location and fill in the required data: name + color indication:

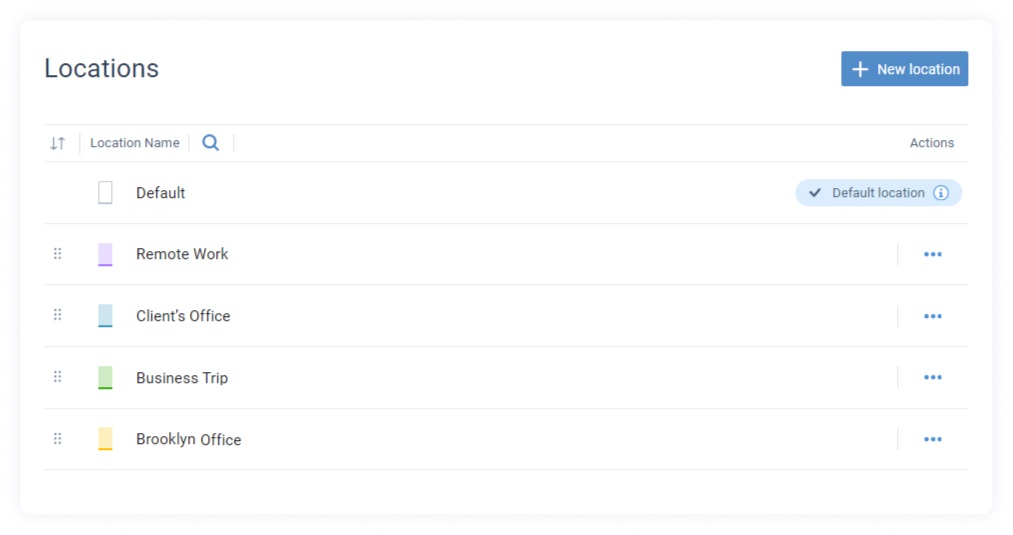
Then, you may edit all location parameters directly in the Locations list:
- Order: The created location types are shown in the system interfaces in the same order as in the Locations list.
- Color code: You can assign a unique color for each of your custom locations using the color picker.
- Name: Click on the location name to edit it and push the Save button to save the changes.
In case you don’t plan to use the created location, you may either delete or archive it. It’s possible to delete merely those locations that were never used. If a location was scheduled in the system at least once, you can merely archive it.
Note: You can set the default location type for each user individually:
- Open the Users list,
- Click on the name of a necessary user to open their account settings,
- Locate the Default Location section and pick a preferred item from the drop-down menu.
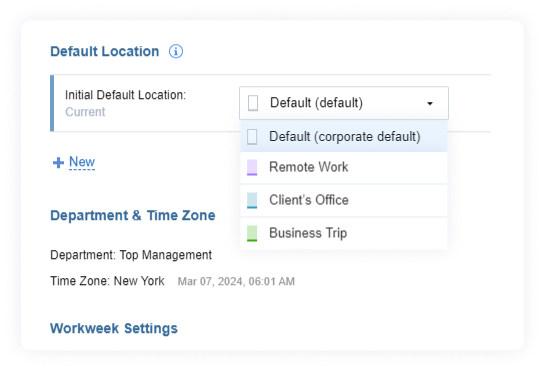
Once done, this individually set default location will be automatically scheduled on a user’s work timeline instead of the system-wide default location type.
Email notifications
- Notifications for Schedule Managers
- Notifications for Regular Users
- Parameters of Email Notifications
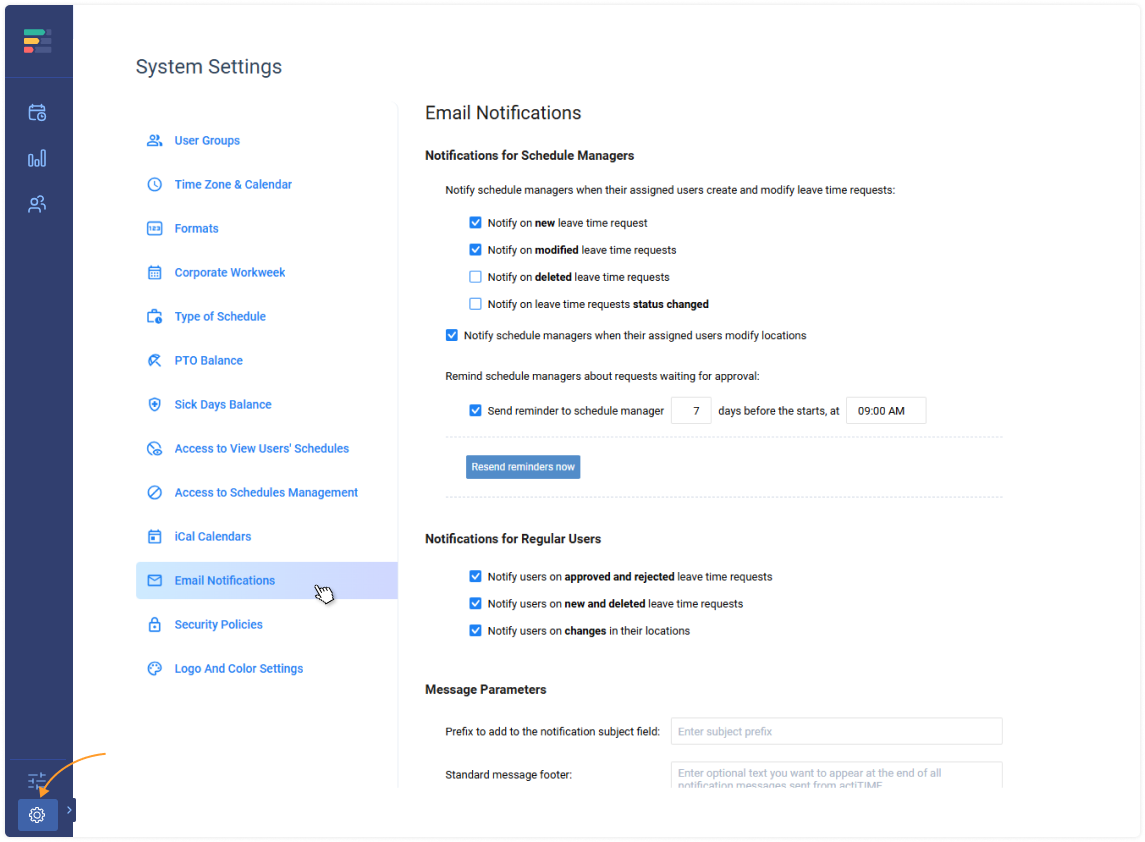
actiPLANS allows you to configure automatic email notifications for the vacation request approval and the location scheduling processes. Notifications are configured in the Email Notifications interface, which can be found under the Settings icon of the top-level menu of actiPLANS.
Notifications, when configured, are sent only to the users with enabled access to actiPLANS.
Notifications for Schedule Managers
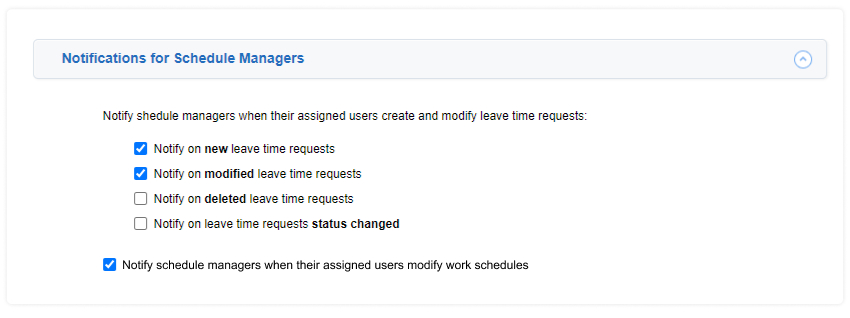
actiPLANS can inform managers when their assigned users’ leave requests or schedules are created and modified. It supports the following notifications:
- Notification on new leave requests. This notification is sent when a new leave request is created for an assigned user. The notification is sent even when the created request is automatically approved.
- Notification on modified leave requests. This notification is sent when the user modifies an existing vacation request. This may be a request waiting for approval or an auto-approved request.
- Notification on deleted leave requests. This notification is sent when the user deletes his/her leave request.
- Notification on changes in the status of leave requests. This notification informs leave time managers about the approval and rejection of the requests submitted by their assigned users performed by other leave time managers.
- Notification about changes in users’ location schedules
It informs schedule managers when an assigned user modifies their personal location schedule.
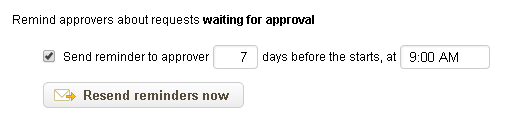
In addition, you can configure a reminder to be sent to leave time managers a few days prior to the starting date of the requests waiting for their approval. The date and time to send the reminder is configured on the system settings.
You can turn each notification on or off. However, this will affect all managers at once – you cannot turn on / off notifications for an individual manager.
Notifications for Regular Users
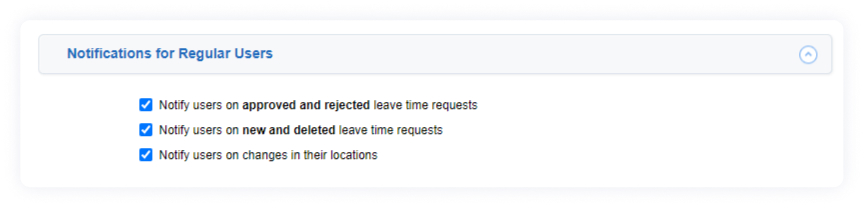
actiPLANS can inform regular users when managers process their leave requests or edit their location schedules. It supports the following notifications:
- Notification on approved and rejected leave requests. This notification is sent when the leave time manager manually approves or rejects the user’s request.
- Notification about new and deleted leave requests. This notification is sent when the leave time manager creates a new leave request for the user or deletes an existing request instead of rejecting or approving it.
- Notifications on changes in location schedules. actiPLANS notifies a user when their locations are modified by a manager.
You can turn each vacation request notification on or off. However, please note that this will affect all users at once – you cannot turn on or off notifications sent to specific users.
Parameters of Email Notifications
Configurable parameters of email notifications include:
- Prefix to add to the notification subject field. You can add an optional text to the beginning of the message subject to simplify the creation of message filtering rules.
- Optional message footer. You can specify standard text that should appear at the end of all notification messages sent from actiPLANS.
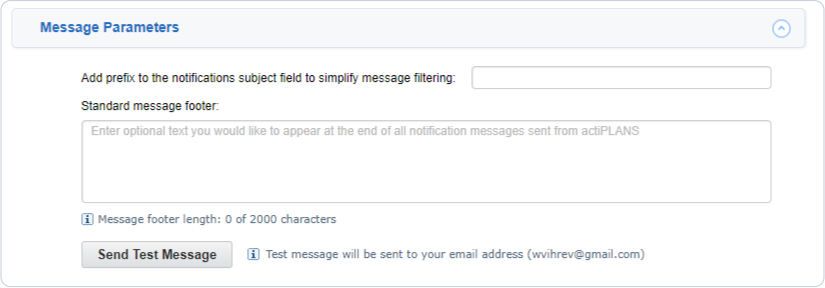
- Email address of system administrator. You can specify the email address of the system administrator who should be informed when actiPLANS cannot send a vacation request notification to its recipients or a user cannot recover their password.

Logo settings
actiPLANS logo is displayed in the upper left corner of the software interface by default. However, you have an option to replace it with your own if you wish.
Just open the Logo Settings and upload a GIF, JPEG, JPG, or PNG image to the system from there – and that’s it!
Please note that to be displayed in actiPLANS correctly, your logo should meet specific size and resolution criteria. You can check them all by clicking the link above the image upload screen.
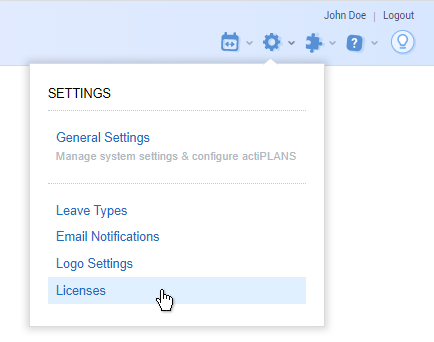
Licenses
In the Licenses interface, you can:
- Review and manage your actiTIME and actiPLANS subscriptions;
- Add billing information and payment methods;
- Enable and disable license managers (selected from the list of active users).
Only confirmed license managers can access this interface and perform the above operations. There are several ways to become one:
- A user who initiates the product trial becomes a license manager automatically.
- Consequently, this first license manager can assign permission to manage product subscriptions to other users of choice: License Managers > Edit > Choose users who can manage licenses.

- Once a user is granted permission, they need to accept or reject it by following the instructions sent with an email notification OR choosing the Accept / Decline option in the Licenses interface directly. Until this step is completed, a new license manager has the Pending Acceptance status, and their access to the Licenses interface is restricted.
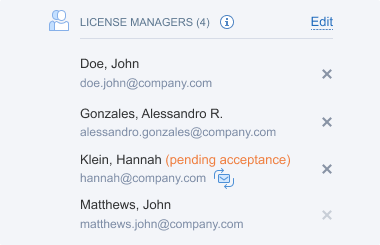
- After a license manager’s status is confirmed, they become able to edit the License Managers list, add new users to it, or delete the existing ones (everyone except themselves).
Besides the rights to run all the subscription-related transactions in the Licenses interface, confirmed license managers can initiate actiTIME-actiPLANS integrations and log in to their product accounts even after the license expires (while other users cannot).
Contact information of confirmed license managers will be used by actiTIME Inc. to deliver service-related messages and notifications. Thus, by accepting the license management permission, users agree to participate in communications with the company and provide their consent for personal data processing in accordance with the GDPR.
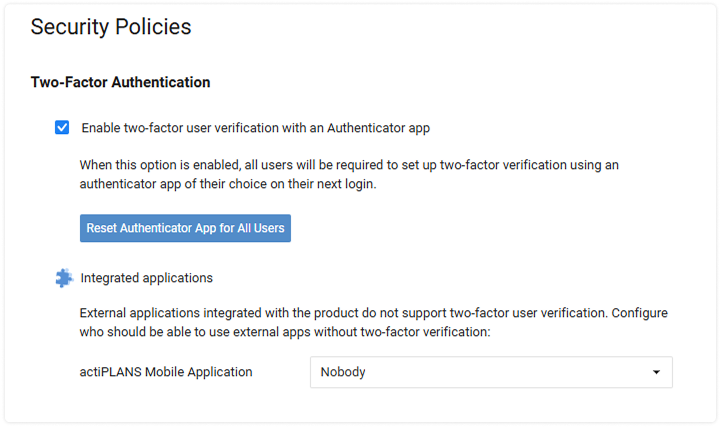
Two-factor authentication
This feature allows admin users to enable or disable two-factor authentication and create tailored security protocols based on organizational needs.
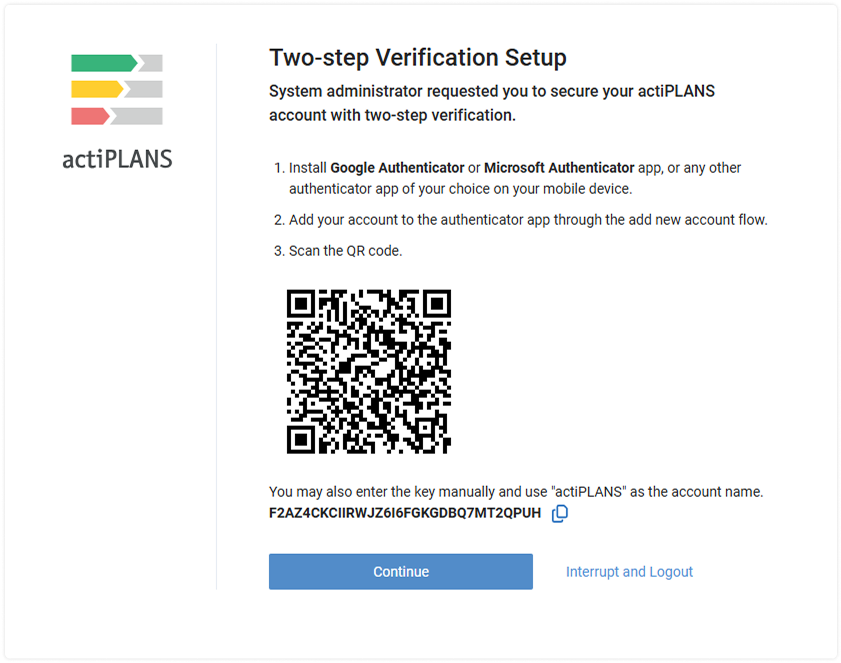
After 2FA is turned on, users will be required to secure access to their accounts using an authenticator app on their next login.
- The user will log in with a username and password or with OTP received via the actiPLANS site.
- The system will show an additional screen with a QR code and instructions for configuring an authenticator app.
- The user will be able to use Google Authenticator, Microsoft Authenticator, or any other compatible application.
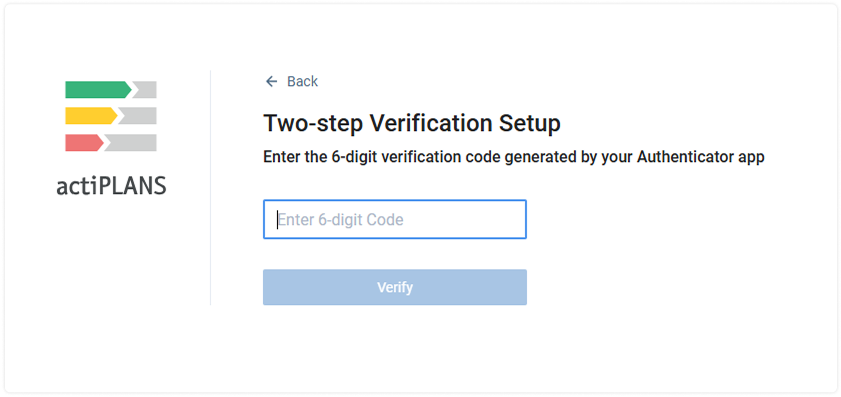
Once the two-factor authentication is configured for a user, the system will require the user to enter a code from their authenticator app after logging in with a username and password or OTP.
The actiPLANS system administrator will be able to reset a user’s authenticator app in the user management interface so that the users could configure their authenticator apps again on the next login.
Enabling two-factor authentication will not affect the actiPLANS function “Keep me logged in”—a successfully authenticated user will be able to keep working with the product.
Setting up two-factor authentication
2FA can be turned on and off via the Security Policies section of actiPLANS General Settings.
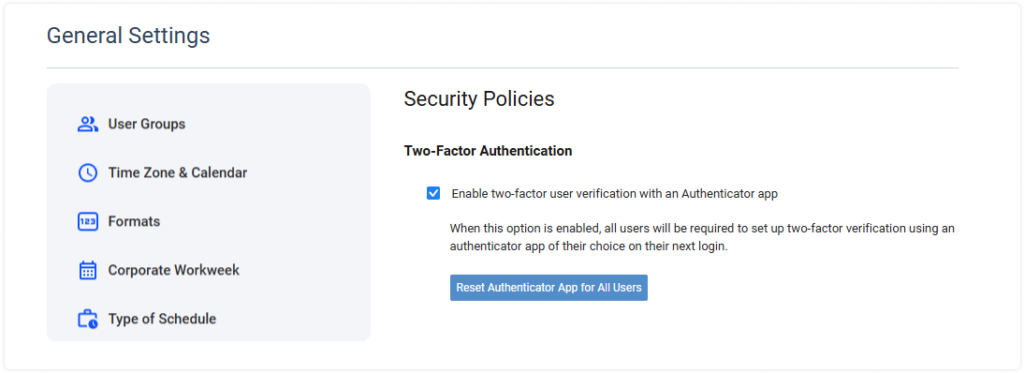
To enable or disable two-factor authentication, the administrator is required to enter their actiPLANS password.
If the administrator turns two-factor authentication off and then back on, the system will keep all authenticator app parameters already configured for users’ accounts.
Once the two-factor authentication is enabled, users will be required to secure access to their accounts using an authenticator app on their next login.
The screen for configuring an authenticator app will be shown after a successful login with a username and password or with OTP received via the actiTIME site.
Configuring two-factor authentication
The user should install the authenticator app, add their account, scan the provided QR code, and then click Continue. After the code is successfully verified, the user will proceed to the regular actiTIME interface.
Log in through the authenticator app
Once the two-factor authentication is configured for a user, the system will require the user to enter a code from their authenticator app after each successful login with a username and password or OTP received via the actiTIME site.
Resetting Two-Factor Authentication
The admin users can reset a user’s authenticator app in the user management interface.
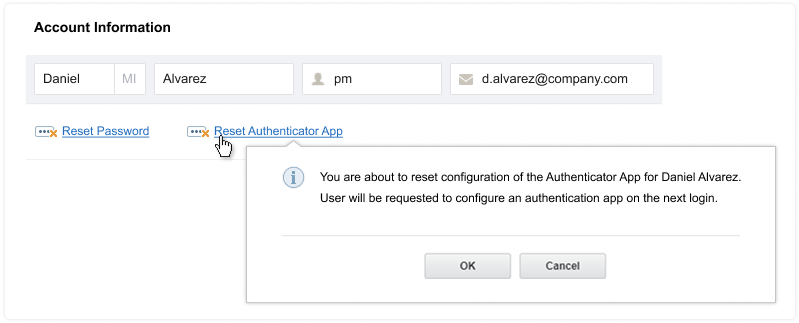
After the reset, the user will be required to configure their authenticator app again on the next login, as if it were never set up.
Using mobile app
The mobile application does not support two-factor authentication.
To keep your data secure, you need to configure which of your team members will be able to use this application.