
actiPLANS helps you automate the processing of employee leave requests: users submit their leave requests through their personal schedule interface, and managers assigned to users as leave approvers can approve or reject these requests.
Leave management in actiPLANS is happening on the Leave Scheduling tab.
For regular users, it’s divided into:
- My Leave Time Requests – This timeline shows your existing leave requests and allows you to submit new requests.
- Schedule of Colleagues – This timeline demonstrates your teammates’ working and nonworking days as well as their leaves. So, on the one hand, you can get information on the availability of your co-workers, and on the other, you can coordinate your leave requests with theirs.
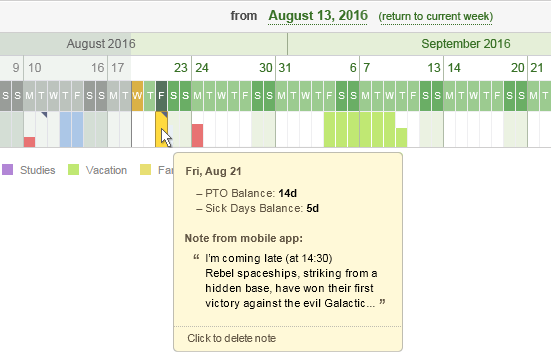
Note: The PTO balance in the upper right corner of the interface is displayed as of the beginning of the selected date.
Besides, the Leave Scheduling interface for regular users includes the Requests tab. There, you’ll find a table with all your leave requests for present and future dates.
If you have rejected requests, they will be shown in the table but will not be shown in the chart at the top part of the interface. Rejected requests are shown in the table for your information only. It is safe to delete them.
Past leave requests are hidden from the Requests interface. You can review these requests in the My Past Leaves Calendar report. Also, you can edit leave time recorded for the past dates in actiTIME when actiPLANS is integrated with it.
Leave managers have the following two interface views:
- Leave Time Planning Chart – An interactive dashboard that allows managers to analyze and manage leave requests and absence notes in a calendar view.
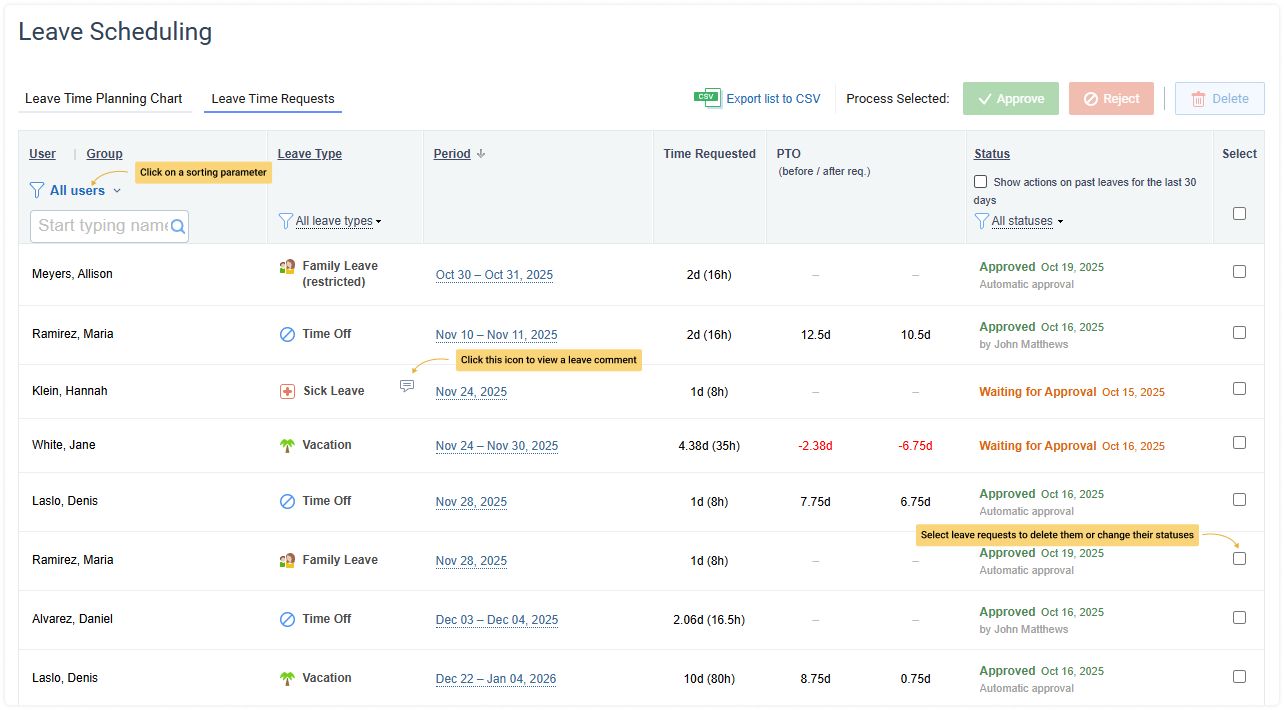
- Leave Requests – A table with a list of leave requests that shows request details and allows a leave time manager to process requests in batch mode.
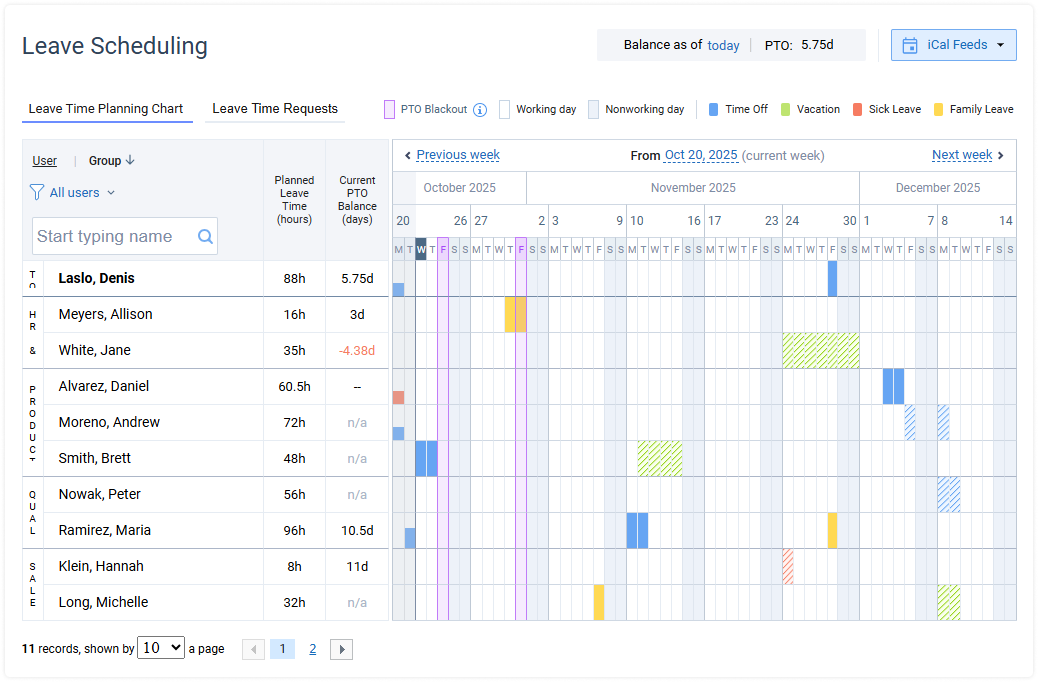
Leave Time Planning Chart
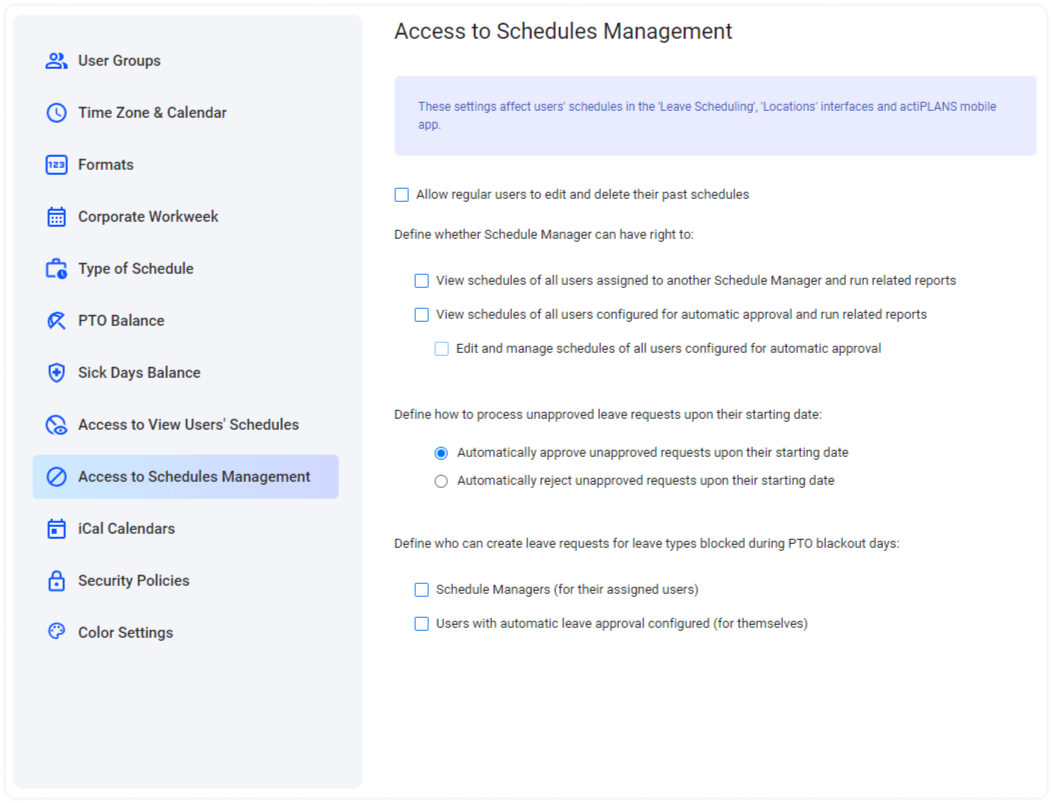
The timeline contains data on leave requests and absence notes submitted by users. By default, the interface shows those users who are assigned to you. However, it is also possible to configure leave management settings so that the interface shows users assigned to other leave time managers and users whose leave requests are configured for automatic approval.
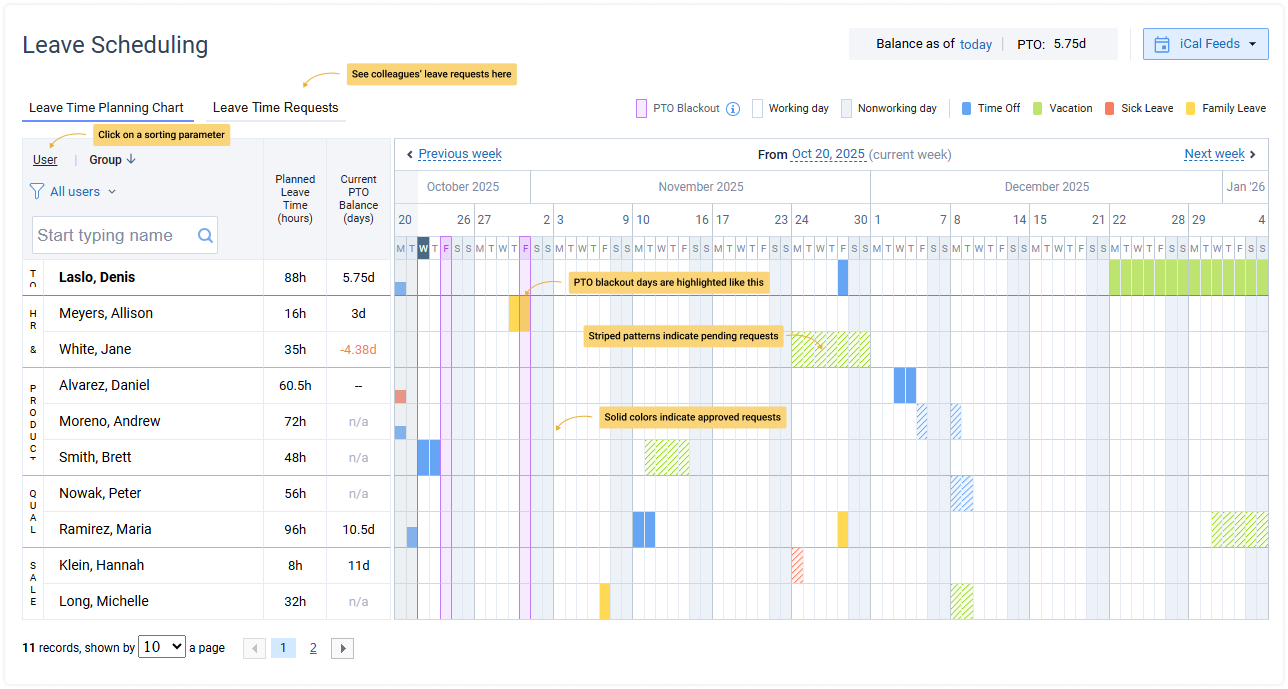
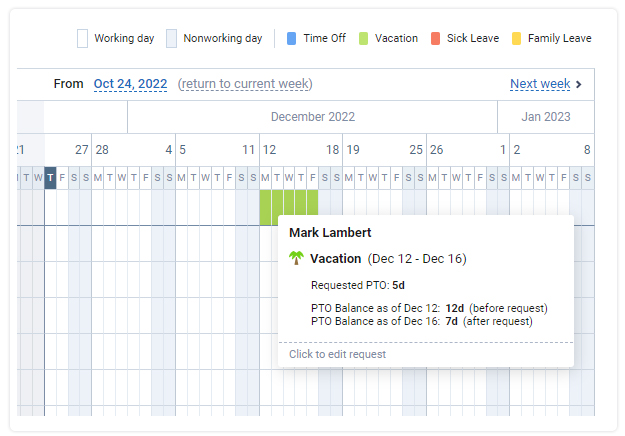
Point the cursor over a request or absence note to see more information about it:

Click on a request or absence note to see available processing options:

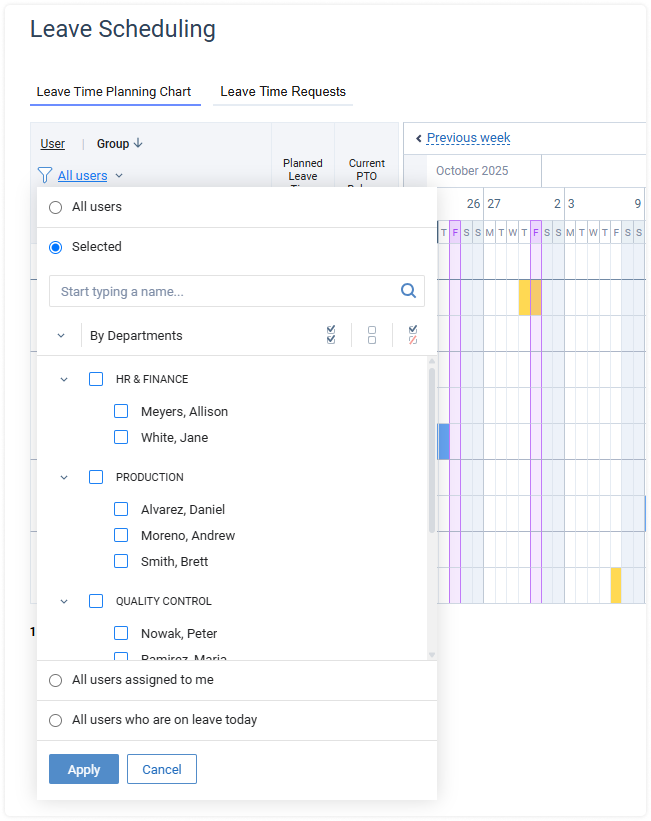
You can filter data in the Leave Schedule of Colleagues using the following options:
- All users
- Selected (by user names, departments, or time zones)
- All users who are on leave today
- All users assigned to me (for managers only)
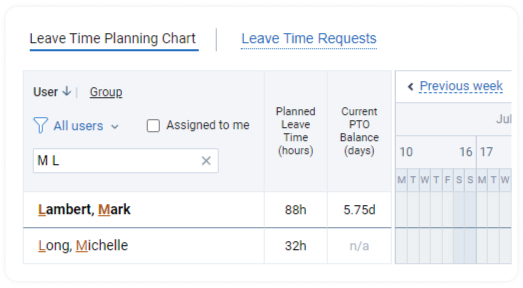
Besides, you can search users in the chart by name:
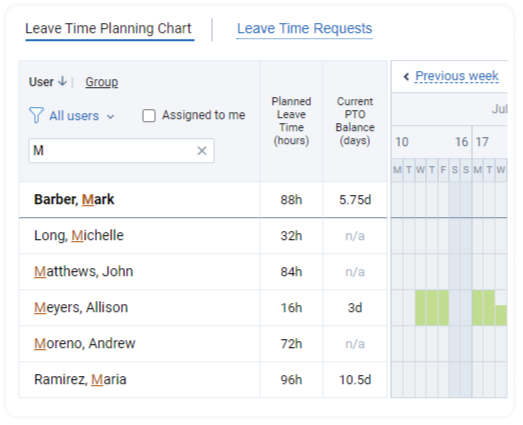
To refine your search, enter more keywords:
Leave type parameters
Leave request describes what type of leave the user is going to have and how much time this leave will take.
Leaves can be requested for both future and past dates. If actiPLANS is integrated with actiTIME, past leaves are requested, modified, and deleted in actiTIME. If the actiPLANS account is independent, leaves for the past dates are tracked directly in actiPLANS.

The leave type selected for the request defines if and how the requested leave time should affect the user’s PTO or Sick Days balance, and whether the leave request requires approval. It also determines which color & icon are displayed for this request in the charts.

It is possible to request only one type of leave for each day. Leave requests of one user cannot overlap.
When specifying how much time the leave will take, the user can define leave duration for the first day of the leave, for the last day of the leave, and for all other intermediate days altogether.
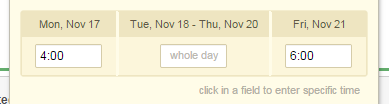
In particular, this means that users can create a request where the first and last days of the leave will be short working hours, and take the full-time leave for in-between days.
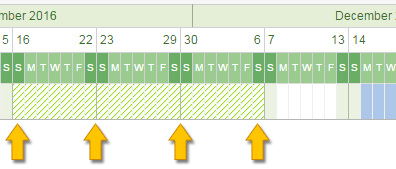
Actual requested leave time is always calculated taking into account the user’s work calendar – the system counts only those leave hours that overlap with expected working hours configured for the employee.
For example, this means that the system will automatically subtract all weekends from a leave request lasting 3 weeks, although it will be shown as one continuous bar in all charts.
actiPLANS allows the employees to inform colleagues when they are coming late or leaving early. This can be done from the mobile application. This info is displayed in the Leave Scheduling interface as a note in a cell.
Leave request process
- Creating a new leave request
- Approval process
- Editing leave requests
- Editing past leaves
- Managing leave requests in bulk
Creating a new leave request
To create a new request, select a date range in the chart …
… and enter the request details:
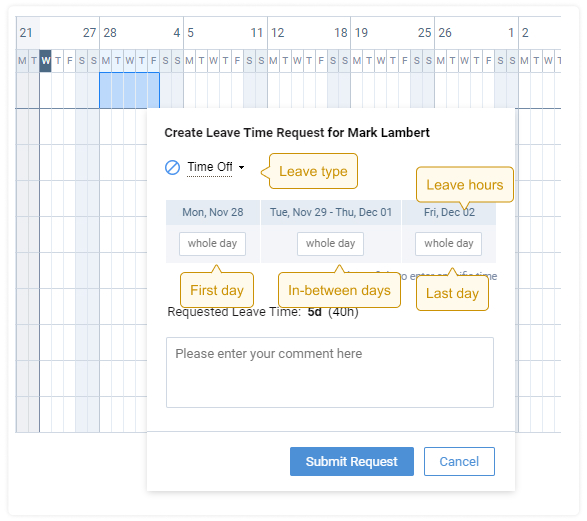
If a future leave request affects your PTO or Sick Days balance, you are able to preview the affected balance before and after the request.
If a change to a past leave request affects your PTO or Sick Days balance, you are able to see how it changes your current balance in the Schedule and Requests tabs before the leave is approved.
Please note that you cannot submit any leave requests before your hire date. Besides, you cannot submit new leave requests in case:
- The Balance limitation setting is switched on in the system, and the ending balance for your leave request falls behind the set threshold.
- Your preferred leave date matches a PTO blackout day + the type of leave you want to schedule is blocked, and you don’t have permission to log time off during PTO blackout days.
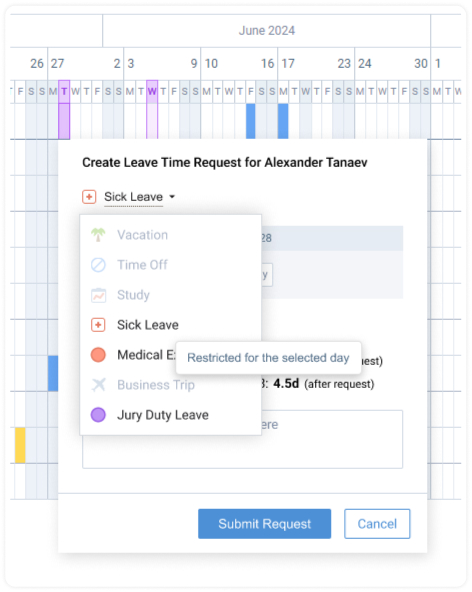
Note: It’s possible to grant some users permission to request time off during PTO blackout days via Access to Schedules Management.
Approval process
Leave requests may have the following status:
- Waiting for Approval – A new leave request submitted by the user requires the manager’s approval. Requests waiting for approval are shown in charts as bars with hatched filling.
A new leave request submitted by a user will have Waiting for Approval status when the approval is required both in the user settings and in the parameters of the leave type selected for the request.
- Approved – The leave request has been approved either by a leave time manager or automatically by the system. Approved requests are shown in charts as bars with solid filling.
A new leave request submitted by a user will be approved automatically when either the auto-approval option is selected in the user settings, or approval is not required in the parameters of the leave type selected for the request.
- Rejected – The leave request has been rejected either by a leave time manager or automatically (once a PTO blackout period is scheduled for the requested days).

Rejected leave requests are shown only in the interfaces displaying requests in the tabular form. You will not see rejected requests in the leave time charts.
Managers who can approve & reject leave requests (leave time managers) are selected from the list of users with Manage Schedules permission (configured in the User List | Account Settings interface):

- When the option ‘Allow Leave Request Managers to edit and manage leave requests of those users who are configured for automatic approval’ is not selected in the general system settings, you can select all users approved by a specific leave time manager …
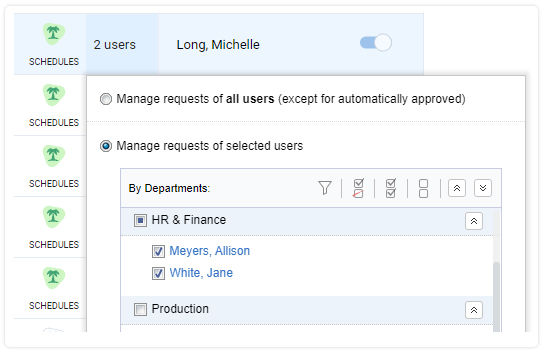
… or assign each user one or several ‘approvers’ from the list of leave time managers:

- When the option ‘Allow Leave Request Managers to edit and manage leave requests of those users who are configured for automatic approval’ is selected in the general system settings, any leave time manager can process requests submitted by any regular user. Note that in this case all leave requests submitted by leave time managers themselves will be approved automatically.
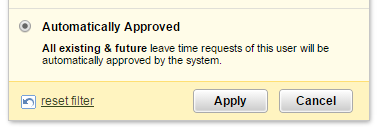
If all leave requests submitted by a user do not require approval, you can choose Automatically Approved instead of assigning specific approvers to this user.
Processing of employee leave requests may be accompanied by email notifications if the corresponding notifications are turned on in the system settings (see section Email Notifications).
Editing leave requests
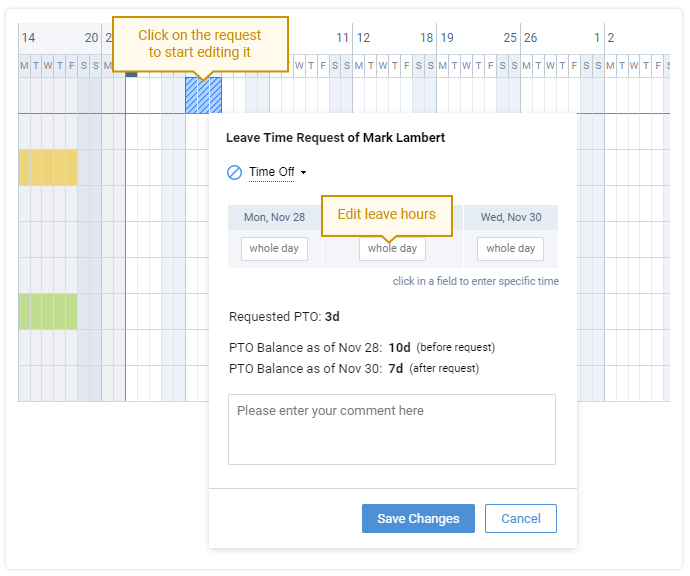
To start editing a request, click on the bar with the request in the Schedule tab…
..or select the Requests tab and change request parameters in the table:
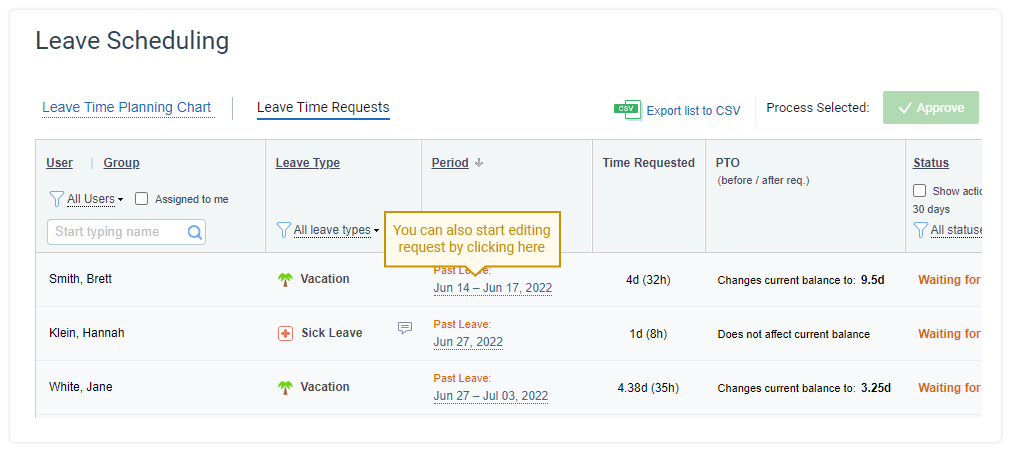
You can also process requests in the Leave Time Requests tab, which shows a list of leave requests with their parameters for all users. Just click on the request status and select the necessary option from a drop-down menu:

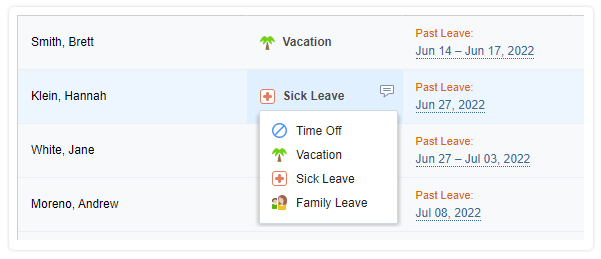
To change the requested type of leave, click on the leave type you want to change:
To edit leave hours, click on the request dates:

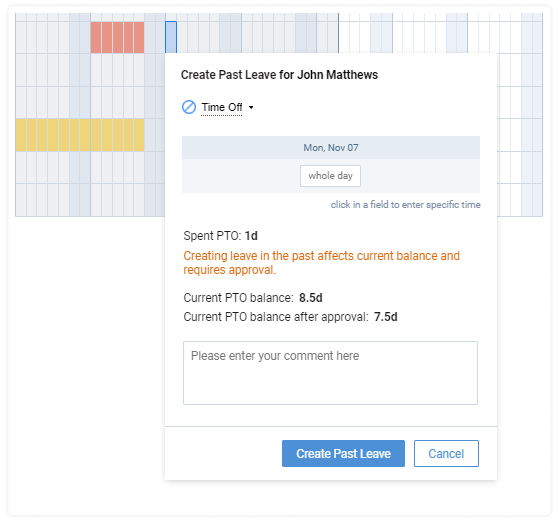
Editing past leaves
In independent actiPLANS accounts that are not integrated with actiTIME, past leaves are requested, edited, and deleted directly in the My Schedule interface. Past leave modifications requested by users who are assigned to leave time approvers require approval if they affect the user’s current PTO or Sick Days balance.
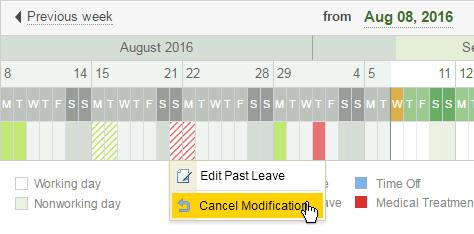
Past leave modification that requires the manager’s approval is marked with a hatched background. Leaves waiting for deletion approval have a red border. The user cannot delete the request until the manager approves it. This modification request can only be canceled.
Following past leave modifications require the manager’s approval:
- Submitting or deleting a leave that affects any balance;
- Changing hours or days for a leave that affects any balance;
For an existing leave request that affects any of the balances, select a leave type that affects other balances or doesn’t affect any balance.
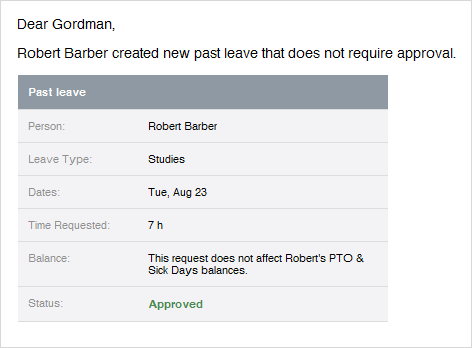
For users whose leave requests don’t require approval, past leave modifications are automatically accepted. For users who have leave approvers, the approval procedure is applied to their past leaves too.
If the past leave modification affects the current PTO or Sick Days balance, it requires the manager’s approval. Requested leaves are marked with a hatched background in the Leave Scheduling interface; leaves waiting for deletion are marked with a red border. The user cannot delete it; the modification request can only be canceled.
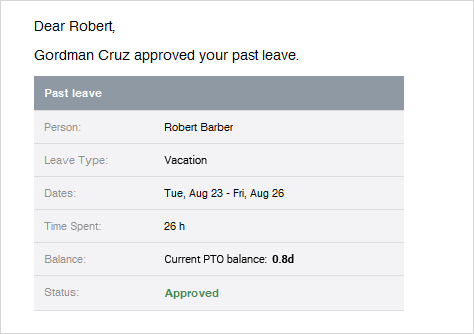
The user receives a notification when the past leave modification is approved or rejected.
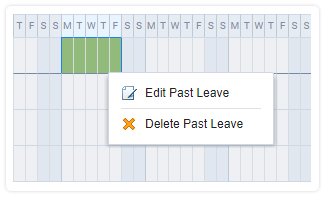
For past leave modifications that don’t affect any balance, no approval is required. They are marked with a solid background in the Leave Scheduling interface. The user can delete this leave.
These leave requests are accepted automatically with an email notification.
Managing leave requests in bulk
You can process leave requests in bulk in the Leave Time Requests tab. Select several leave requests to be processed at once using the checkboxes in their rows.
Once requests are selected, you can process them by clicking the buttons above the table:
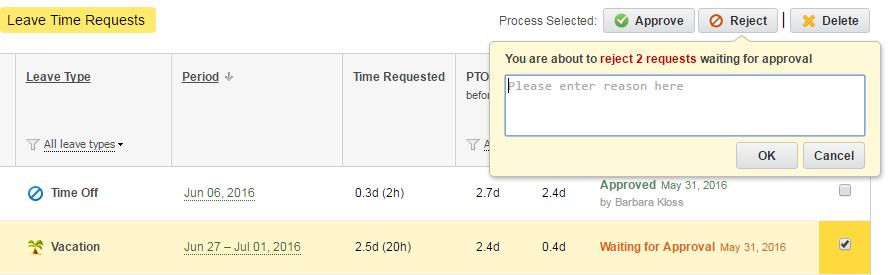
- Approve button works immediately, without additional confirmation.
- If you click on the Reject or Delete button, the system will show you a confirmation panel:
You can save the listed leave requests as a CSV file by clicking on the export button above the table.
Note that the list will be downloaded just as you see it at the moment of export – the applied filters and sorting options will be kept in the CSV file.
